Friday, September 6, 2013
Friday, August 2, 2013
DIY Friday - Modeling Paste
Always late to the party, I find that I am only now really digging into the artsy side of this hobby. I've developed a strong interest in creating an art journal, and in fact, will begin that process this weekend while I'm away at a retreat. Don't get me wrong, I have TONS of artsy supplies already - paints, stains, inks, sprays, mists, even gesso. And I love getting messy and seeing what I can create. I just have yet to translate that into my regular scrappy routine.
At any rate, I've been on the hunt for videos and tutorials showing how to use certain products, and I came across this video, which triggered my memory of this thread on 2Ps, in which a generous poster shared her recipe for making your own modeling paste. I just had to try it!
So I started by gathering my supplies: talcum powder, Elmer's glue, acrylic paint, a craft stick, and a screw-on lidded container.

Measured out 1/2 cup of the powder,

2 tablespoons of the glue,

and 2 tablespoons of the paint. The original poster suggested using white paint. I didn't have any, so I used cream instead. For my purposes, it worked great.

The next step was to stir. I found that the mixture was a little too dry, so I added what probably amounted to another tablespoon of the glue.

Then I got the consistency I had hoped for. To be honest, I've never used "real" modeling paste, so I didn't really know what I was after.

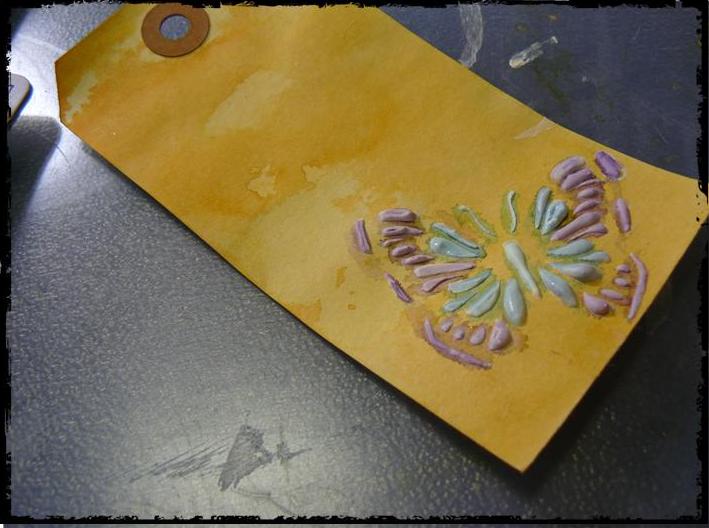
So now that my recipe was complete, I wanted to test out the final product on an actual project! I started with a plain manila tag, then did a quick watercolor technique with Distress Inks.

Bonus DIY: I so loved the butterfly from the video that I wanted to recreate it. I still have Make the Cut software on my little old personal Cricut, so I was able to cut the images I wanted and to place them where I wanted them to be. I'm not sure, but I *THINK* Silhouette users have the same ability. Anyway, I did a Google images search for "butterfly stencil," came up with TONS of images, and chose a bunch that I liked. Grouped them together on the virtual mat, set it to multi-cut 5 times, loaded a 6 x 6 stencil blank, and bam! Custom stencils!

The homemade paste went on like butter.

It worked exactly as I had hoped it would. I hit it with the heat gun for a little bit to hurry
along the drying process.

Finally, I used my two favorite Distress Ink colors - Broken China and Dusty Concord - to wash over the paste. Next time I'll probably just use a mist, but I like the funky effect of this well enough. And, bonus - it smells sweet too!
So there you have it! Go mix up a batch and show me what you do with it!
Here's that recipe, directly from the post on 2Ps:
1/2 cup Baking Soda or Talcum Powder
2 Tablespoons PVA glue ( the white glue that dries clear)
1-2 Tablespoons acrylic paint. ( I usually use white )
Mix all together and store in an airtight container. I found that the talc gives a smoother texture than the baking soda. .....and it smells nice too. You may need to add a few drops if water to get the right consistency.
(Quoting kiwifarmer)
P.S. Make-the-Cut software has a pixel trace function that allows the images I found on Google to be converted to cut files.
P.P.S. There is no way I can find time in my schedule to do a DIY Friday post every week, so at this point I'm aiming for more like once a month, probably the first Friday of every month. I hope you enjoy them!
Monday, July 15, 2013

Like most people, I take tons of photos in December, especially on Christmas Day. Now that my sons are older, I don't feel as overwhelming a need to scrapbook every. single. one. Still, even paring down leaves me with a dozen or more photos to work with.
I had tons of BoBunny Blitzen papers and embellishments left over from a class I taught last year, so I employed it in creating these layouts:


I found that I still had tons of Christmas morning photos even after I made these layouts, so I switched to pocket pages to store and display the rest of them. I recently bought several sheets of cream-colored notebook paper at Hobby Lobby, and I immediately came home and sliced them all up into 4x6 and 6x4 blocks for creating journaling blocks for just such pages. A few embellishments and some handwriting, and voila!
 (front)
 (back)
 (front)
 (back)
I hope I've given you some inspiration for getting lots of Christmas photos scrapped, as well as using up any older Christmas stash you might have lying around. And to help get you into the Christmas mood, I'm giving away a couple of little stocking stuffers from my Etsy shop: A yard each of Maraschino and Peapod baker's twine, and a foot each of red polka dot and green gingham ribbon tape. To win them, simply become a follower of my blog. If you are already following, just leave a comment letting me know, and you'll be entered
to win too!
to win too!

Now onto the next stop: Margaret's blog
Friday, July 12, 2013
DIY Friday
Do you love the look of those adorable little enamel dots, but don't have any in your stash? I can't remember exactly what got me started on this quest, but at some point recently, I started looking for ways to create my own enamel dots. I found an interesting tutorial on YouTube that used floral beads, and it seemed like an inexpensive way to create (and recreate, as needed) tons of these little gems. I couldn't find the beads, though, so I started doing some brainstorming of my own. Here's my first attempt:
I started with copy transparencies I already had on hand (I use these to store my unmounted rubber stamps on). I rounded up a couple of nail polish colors from my bathroom cabinet, and picked up a few more from Dollar Tree and Walmart. I also gathered up all my small circle punches.

Next, I painted a coat of each of the colors I wanted to use onto the transparency, then let it sit to dry for about 10 minutes.

I cut out my strips in preparation to punch them. I liked the look of one coat, but to get more even coverage, I decided to go ahead and do a second coat.

You can see here that the strips of color do have some transparency to them, though I wasn't sure how that would translate on the actual scrapbook page.

Time to punch! I had this little "craft punch" that makes circles about 3/8 of an inch. It's not a very sturdy punch, and eventually got so it didn't stand up very well to the acetate. It began to hang up, so I had to abandon that, even though I liked the size.

Next, I tried my Crop-a-dile. This little workhorse punched right through the plastic like a hot knife through butter, but I quickly saw that the little circles tended to fly all over the place!

I tried punching with the Crop-a-dile facing so that the punchies could fall directly into the little plastic cup I was collecting them in. Eventually, I started holding my left hand over the top and then ejecting the punchies, but that left me with no hands to take pictures! ;)

Finally, I tried my old-fashioned hole-punch.

I found that it didn't completely punch the circle,so went back to the Crop-a-dile to finish out the job.

So, in the end I had a cup full of - you've probably already guessed this - candy-colored confetti. That's right, my creations look more like confetti than the coveted enamel dots. And they did not have an adhesive backing, which meant I would need to use some sort of liquid glue to attach them. Still, I had to see how they would look on a layout.

Just so happened, I had one that needed a little extra "something," so I gave it a go, and this is what I came up with:

I have to say, while I like the end result (I may play with adding a few more), but this was not the look I was ultimately going for. I still have another idea or two I may try. And I think I'll use the rest of my confetti on some card creations!
Would love to see your examples of DIY enamel dots! Please feel free to link me up in the comments!
LH
Wednesday, July 10, 2013
New items in my Etsy shop!

Hey all!
I've just come back from vacation, and it was wonderful! Hubby and I went back to Gatlinburg, Tennessee for the 3rd time. We stayed an entire week, and we even drove over into North Carolina and visited the Biltmore Estate. It was breathtaking, and I could never imagine living like that!


Wednesday, June 12, 2013
Bloglovin'

Okay, so I'm not the most faithful blogger (something I am working on!), but I do love to return to my favorites over and over. I've had a love affair going on with Google Reader for quite some time, but, alas, they announced earlier this year that they will be discontinuing their reader service effective July 1.
So after a mourning period, I began searching for an alternative way to collect and keep my favorites all in one place. I tried a couple, only to find that they were linked to Google Reader, and would not work once it disappeared. So back to Square One. Then the other day, I happened across one of my NEW favorite blogs, Scrap Our Stash, and noticed that there on the right was a little link saying "Follow my blog with Bloglovin." Curious, I clicked through, and found (to my delight) a NEW way to follow all my blogs WITHOUT having to rebuild my list again from scratch or import each one, one at a time. Yes, Bloglovin even does the heavy lifting of importation for you! Hallelujah!
So, if you love your blogs like I do, consider setting up an account with Bloglovin. It's free, easy, and fun! (Oh, and if you're migrating over from Reader and need help figuring out how, just leave me a comment or shoot me an email - I'd be glad to help you out!)
Lisa Harris
kwitekreative@aol.com
P.S. Notice I now I have MY OWN little button that says "Follow my blog with Bloglovin!" Go ahead, click. It won't hurt a bit! :)
Monday, June 10, 2013
Fancy Pants and Flickr
At long last I got the chance to scrap with two of my good friends, and we had a blast catching up and creating pages. While I wasn't a productive as the gal who got 10 pages done that day, I did get down a story I've been wanting to tell, and I am super happy with that. Here are my pages:
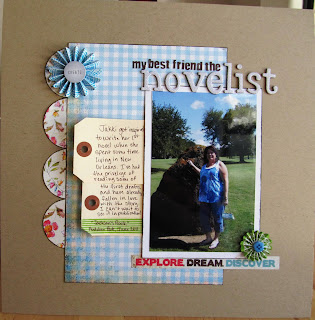 My Best Friend the Novelist: *Inspired by June PageMaps Fancy Pants Hopscotch papers, Amy Tangerine Delights paper flowers, washi tape from Michael's, American Crafts Thickers
 Setting is Everything: Fancy Pants Hopscotch papers and alphas, Amy Tangerine Delights paper flower, Bitty Bag from Endless Inkabilities (Etsy store), Lily Bee Bag of Bits diecuts, American Crafts Thickers, bits and pieces from past MemoryWorks Express kits
In other news, while I've got a little free time (yay summer!), I've decided to collect all my "kreations" into one spot. So if you're ever of a mind, you can stop by my new Flickr photostream and see for yourself how my scrapbooking and cardmaking has evolved over time. It is in fact, still in progress, as the site won't let you upload more than 200 photos at a time - yikes! I'll be back later in the week to showcase a few of my personal faves. And if you're on Flickr, I'd love to see your photos - leave me a comment or drop me an email at kwitekreative@aol.com.
Till next time!
LH
Sunday, May 5, 2013
Fancying Up My Camera
My precious pups somehow got hold of my camera a while back and one them chewed off one of the little plastic bits that holds the strap on. On a recent shopping trip to Hobby Lobby I found silver conchos and realized they would do the job. I had already ordered a strap cover from my thirty-one consultant so when it came in I couldn't wait to pretty it up. Now if I could just find that lens cover...

Saturday, April 13, 2013
My Space in its Current Incarnation
***This is a repost of my guest post on the MemoryWorks blog*** (yep, cheating again! LOL)
Hello all! Back again to take you on a little tour of my creative space. Funny thing - I should be posting pictures of my over-full rolling totes, because these days, it seems the only time I get things done is at a crop. But, I am blessed to have my own scrappy space (and WAY too much stuff to organize in it) so I'll show you that instead. ;)

My room is about 10 x 12, so I use it as an office, small crop store, and scrap studio. I've got the majority of my scrappy items together in an L-shaped configuration with my desk and mesh cubes from Target.

The desk is made from a hollow core door that I spray painted black and 2 Wal-Mart bookshelves that my hubby and I "hacked" to make the whole thing desk-height. I love the large work surface! On top is a plastic mat from Ikea that I use to protect the desktop. All my heavily-used tools are at arm's length. My tool tote is on a lazy susan, because, although my name's not Susan, well... On the bookshelves underneath I have all my Etsy supplies and a few lesser-used tools. There's also an Iris cart that holds all my Cricut supplies, a 12 x 12 drawer unit, and my "basket of shame" - a picnic basket that holds my obscene amount of scraps.
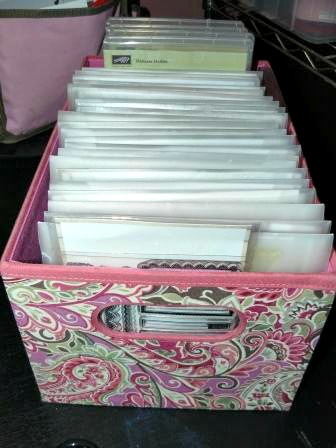
 The mesh cubes hold all my papers, cardstock, page protectors, embellishments, ribbons, paints, templates, and project files.
 This wire rack sits on top of my desk against the wall. I don't love it -
it looks too cluttery. I'll probably build my mesh cubes up another
level to hold the stuff from the shelf and install some Bygel rails on
the wall where it is now.
This wire rack sits on top of my desk against the wall. I don't love it -
it looks too cluttery. I'll probably build my mesh cubes up another
level to hold the stuff from the shelf and install some Bygel rails on
the wall where it is now.
 I love this bookcase from Ikea. It holds all my idea books and magazines, plus some special mementos.
 This little bookshelf holds lots of stamps and inks. I'm obsessed with
stamps. I remember telling my CTMH representative many years ago that I
wasn't going to get into stamps. Now I have more than I can use. I'll be
writing a blog post about this very soon, so check it out.
This little bookshelf holds lots of stamps and inks. I'm obsessed with
stamps. I remember telling my CTMH representative many years ago that I
wasn't going to get into stamps. Now I have more than I can use. I'll be
writing a blog post about this very soon, so check it out.

Love my pinboard. It hangs right over my desk. I like to change out quotes and sayings that motivate me. I've had this one up for a while.

My Distress Ink storage. This is a jewelry holder I bought at Michael's. I need more inks!

More stamp storage. These are the stamps I've deemed as "scrapbooking stamps," so I keep them on my desk in hopes that I'll remember to use them.
So that's my little scrappy corner of the world. Thanks for stopping by today! You can visit me anytime at http://mykreativepursuits.blogspot.com or soon at www.scrapbookcurriculum.com.
Hello all! Back again to take you on a little tour of my creative space. Funny thing - I should be posting pictures of my over-full rolling totes, because these days, it seems the only time I get things done is at a crop. But, I am blessed to have my own scrappy space (and WAY too much stuff to organize in it) so I'll show you that instead. ;)

My room is about 10 x 12, so I use it as an office, small crop store, and scrap studio. I've got the majority of my scrappy items together in an L-shaped configuration with my desk and mesh cubes from Target.

The desk is made from a hollow core door that I spray painted black and 2 Wal-Mart bookshelves that my hubby and I "hacked" to make the whole thing desk-height. I love the large work surface! On top is a plastic mat from Ikea that I use to protect the desktop. All my heavily-used tools are at arm's length. My tool tote is on a lazy susan, because, although my name's not Susan, well... On the bookshelves underneath I have all my Etsy supplies and a few lesser-used tools. There's also an Iris cart that holds all my Cricut supplies, a 12 x 12 drawer unit, and my "basket of shame" - a picnic basket that holds my obscene amount of scraps.


Love my pinboard. It hangs right over my desk. I like to change out quotes and sayings that motivate me. I've had this one up for a while.

My Distress Ink storage. This is a jewelry holder I bought at Michael's. I need more inks!
More stamp storage. These are the stamps I've deemed as "scrapbooking stamps," so I keep them on my desk in hopes that I'll remember to use them.
So that's my little scrappy corner of the world. Thanks for stopping by today! You can visit me anytime at http://mykreativepursuits.blogspot.com or soon at www.scrapbookcurriculum.com.
Sunday, April 7, 2013
Is this cheating?

This doesn't technically qualify as new content, but I was playing around with Wordle for a class assignment today, and thought I'd see what it came up with when I typed in my blog address. Pretty cool, if you ask me.
So,yeah. It's been a while since I've posted here. I have these visions of posting great stuff at least once a week, then life gets in the way and a month and a half goes by before I find myself here again. Last month I was a guest poster on the MemoryWorks blog, so that's where all my new content ended up. This month? Well, let's just say that taking a technology class AND a reading comprehension class is about to do me in. But this too shall pass, and soon I will be free to happily post away again. Famous last words and all. :)
Saturday, February 16, 2013
NEW My Mind's Eye and February Express Kit Reveal
Some of my favorites from CHA-W came from My Mind's Eye, so I am ecstatic to see them already in the MemoryWorks store! I know what I'm ordering soon!


The February Express Kit has been revealed, and as always, it is fabulous! Loads of goodies from - yep - My Mind's Eye, American Crafts, Petaloo, Pebbles, and May Arts. Check out the Idea Express for some fun inspiration. If you would like to order one of these leftover kits, let me know.

Subscribe to:
Posts (Atom)