Do you love the look of those adorable little enamel dots, but don't have any in your stash? I can't remember exactly what got me started on this quest, but at some point recently, I started looking for ways to create my own enamel dots. I found an interesting tutorial on YouTube that used floral beads, and it seemed like an inexpensive way to create (and recreate, as needed) tons of these little gems. I couldn't find the beads, though, so I started doing some brainstorming of my own. Here's my first attempt:
I started with copy transparencies I already had on hand (I use these to store my unmounted rubber stamps on). I rounded up a couple of nail polish colors from my bathroom cabinet, and picked up a few more from Dollar Tree and Walmart. I also gathered up all my small circle punches.

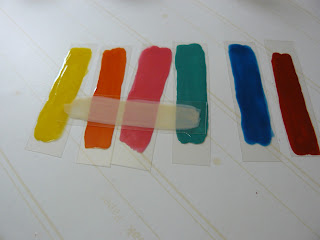
Next, I painted a coat of each of the colors I wanted to use onto the transparency, then let it sit to dry for about 10 minutes.
I cut out my strips in preparation to punch them. I liked the look of one coat, but to get more even coverage, I decided to go ahead and do a second coat.
You can see here that the strips of color do have some transparency to them, though I wasn't sure how that would translate on the actual scrapbook page.
Time to punch! I had this little "craft punch" that makes circles about 3/8 of an inch. It's not a very sturdy punch, and eventually got so it didn't stand up very well to the acetate. It began to hang up, so I had to abandon that, even though I liked the size.
Next, I tried my Crop-a-dile. This little workhorse punched right through the plastic like a hot knife through butter, but I quickly saw that the little circles tended to fly all over the place!
I tried punching with the Crop-a-dile facing so that the punchies could fall directly into the little plastic cup I was collecting them in. Eventually, I started holding my left hand over the top and then ejecting the punchies, but that left me with no hands to take pictures! ;)
Finally, I tried my old-fashioned hole-punch.
I found that it didn't completely punch the circle,so went back to the Crop-a-dile to finish out the job.
So, in the end I had a cup full of - you've probably already guessed this - candy-colored confetti. That's right, my creations look more like confetti than the coveted enamel dots. And they did not have an adhesive backing, which meant I would need to use some sort of liquid glue to attach them. Still, I had to see how they would look on a layout.
Just so happened, I had one that needed a little extra "something," so I gave it a go, and this is what I came up with:
I have to say, while I like the end result (I may play with adding a few more), but this was not the look I was ultimately going for. I still have another idea or two I may try. And I think I'll use the rest of my confetti on some card creations!
Would love to see your examples of DIY enamel dots! Please feel free to link me up in the comments!
LH


No comments:
Post a Comment