Always late to the party, I find that I am only now really digging into the artsy side of this hobby. I've developed a strong interest in creating an art journal, and in fact, will begin that process this weekend while I'm away at a retreat. Don't get me wrong, I have TONS of artsy supplies already - paints, stains, inks, sprays, mists, even gesso. And I love getting messy and seeing what I can create. I just have yet to translate that into my regular scrappy routine.
At any rate, I've been on the hunt for videos and tutorials showing how to use certain products, and I came across this video, which triggered my memory of this thread on 2Ps, in which a generous poster shared her recipe for making your own modeling paste. I just had to try it!
So I started by gathering my supplies: talcum powder, Elmer's glue, acrylic paint, a craft stick, and a screw-on lidded container.

Measured out 1/2 cup of the powder,

2 tablespoons of the glue,

and 2 tablespoons of the paint. The original poster suggested using white paint. I didn't have any, so I used cream instead. For my purposes, it worked great.

The next step was to stir. I found that the mixture was a little too dry, so I added what probably amounted to another tablespoon of the glue.

Then I got the consistency I had hoped for. To be honest, I've never used "real" modeling paste, so I didn't really know what I was after.

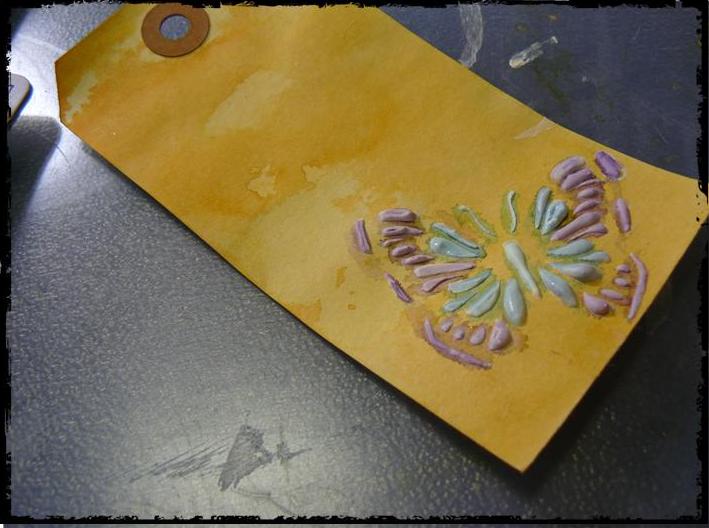
So now that my recipe was complete, I wanted to test out the final product on an actual project! I started with a plain manila tag, then did a quick watercolor technique with Distress Inks.

Bonus DIY: I so loved the butterfly from the video that I wanted to recreate it. I still have Make the Cut software on my little old personal Cricut, so I was able to cut the images I wanted and to place them where I wanted them to be. I'm not sure, but I *THINK* Silhouette users have the same ability. Anyway, I did a Google images search for "butterfly stencil," came up with TONS of images, and chose a bunch that I liked. Grouped them together on the virtual mat, set it to multi-cut 5 times, loaded a 6 x 6 stencil blank, and bam! Custom stencils!

The homemade paste went on like butter.

It worked exactly as I had hoped it would. I hit it with the heat gun for a little bit to hurry
along the drying process.

Finally, I used my two favorite Distress Ink colors - Broken China and Dusty Concord - to wash over the paste. Next time I'll probably just use a mist, but I like the funky effect of this well enough. And, bonus - it smells sweet too!
So there you have it! Go mix up a batch and show me what you do with it!
Here's that recipe, directly from the post on 2Ps:
1/2 cup Baking Soda or Talcum Powder
2 Tablespoons PVA glue ( the white glue that dries clear)
1-2 Tablespoons acrylic paint. ( I usually use white )
Mix all together and store in an airtight container. I found that the talc gives a smoother texture than the baking soda. .....and it smells nice too. You may need to add a few drops if water to get the right consistency.
(Quoting kiwifarmer)
P.S. Make-the-Cut software has a pixel trace function that allows the images I found on Google to be converted to cut files.
P.P.S. There is no way I can find time in my schedule to do a DIY Friday post every week, so at this point I'm aiming for more like once a month, probably the first Friday of every month. I hope you enjoy them!
Like you I always seem late at times on new things..but glad you made it. The butterfuly is very cool!
ReplyDeleteLOL Glad I'm not the only one! Thanks!
Deletewow... i will have to try this out. had no idea you could make your own modeling paste!
ReplyDeleteBe sure to share your project(s) if you do! I'd love to see!
DeleteLisa, this is awesome! I never would have thought to make my own modeling paste - and I can't believe it's such simple ingredients! You should teach this as a class! And yes - the Silhouette can do masks like that pretty easily!
ReplyDeleteYep, it is simple, and turned out even better than I had expected. Cool to know about the Silhouette. Someday when my Cricut goes kaput, I'm gonna get me one of those!
DeleteAwesome, TFS
ReplyDeleteThanks for stopping by!
DeleteThat butterfly is beautiful!
ReplyDelete